Fusionista
Contour and Highlight Like a Pro
Contouring and highlighting is all about playing up your features! Everyone can gain from a little contouring and highlighting. The trick is to slightly darken certain areas and lighten the areas you want to accentuate (such as bringing out the cheekbones you never that you had)! Keep it simple and with a contouring here and highlighting there, your end result will be a more sculpted, glowing appearance.
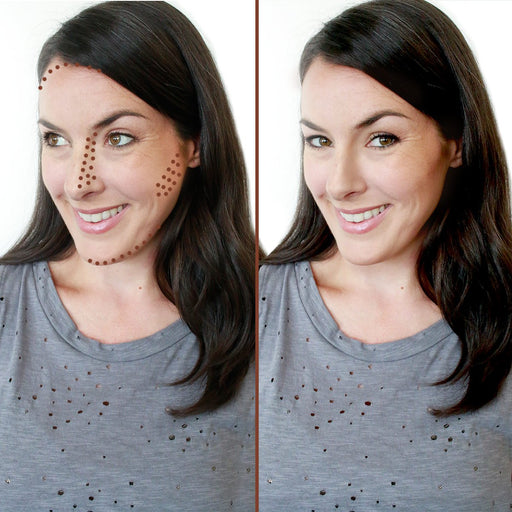
Step 1: Start with a freshly, clean and moisturized face. Locate the hollow area of your cheekbones. A trick to finding this area is to suck in your cheeks and find the natural depression. This depression is where you will contour (the hollow part of your cheekbone).
Step 2: Using the Blush Brush, and the darker half of the Luster Bronzer Duo, brush into the hollow of your cheeks towards your ears (located in Step 1). Blend, blend, blend - this is a crucial part in achieving a natural-look when contouring.
Step 3: Sculpt your chin and jawline by brushing the contouring powder underneath the tip of you chin and thoroughly blending along your jawline.
Step 4: To give you nose a slimming effect, lightly dust the contour powder along the sides of your nose. A little goes along way, so use sparingly. To slim the tip of the nose, shade each side of the tip, above the nostrils. TIP: For contouring a small area, use Eye Contour Brush. Its smaller, slanted shape will help deposit just the right amount of color needed and allows for greater control during application.
Step 5: Now you are ready to highlight. Using the Blush Brush, apply the lighter half of the Luster Bronzer Duo, along the top of your cheekbones (from the tops of your cheekbones out towards your temples), the bridge of your nose and your cupids bow. If you prefer a cream highlighter, the 3-in-1 in Rosette or Terra Cotta works wonders in highlighting and is easily applied with your fingertips.